DIY Cross Drilled Rotor
In keeping with the theme of working on the front end, it’s time to cross drill the rotor. Everyone seems to agree that you get much better performance with a cross drilled rotor, most notably when it’s raining. I was originally planning on sending the rotor out to be drilled, but what fun is that? After reading up on the SOHC forums about other people drilling their own rotors, I was pretty confident I was up to the task. I went out and picked up 2 Dewalt 1/4″ Cobalt drill bits from Lowe’s, and a bottle of 3-in-1 oil to use for lubrication. I also grabbed a Hitachi 3/8″ Titanium countersink bit, which proved to be a mistake, but more on that later.
I downloaded a drilling template that I found in one of the threads on the SOHC forums and printed out a few copies. The template was too big for the page, so I had to align 3 of them together to cover the entire rotor. With the template taped down, I went around and center punched all 60 holes, then removed the template.
I setup my drill press with the 1/4″ bit, put a drop of oil on the first mark, and started drilling. I went pretty slow at first, not knowing how well the bit was going to cut. I backed the bit out a few times, each time adding a drop of oil into the hole. I won’t lie – it was a relief to get the first hole drilled with out any catastrophes. No broken bit, no cracked rotor, no spontaneous combustion. So far, so good. The drilling went faster once I developed a feel for the process, and the bit was holding up well. At one point about 1/4 of the way around the rotor, I noticed on of the 3-hole rows was slightly misaligned. I initially thought this was an artifact of misalignment when I laid out the templates, but shortly after I discovered that the drill bit was starting to wander off the center punch marks when starting the holes.
Once I noticed the problem, I started paying closer attention and was able to finish the rotor without any more alignment issues. If I had to do it over again, I think I would start each hole with a smaller bit, which I’m assuming would be a little easier to align to the center punch marks. Overall, the pattern came out looking pretty good, and you really can’t notice the misaligned row when the rotor is on the wheel.
After drilling all the holes, I moved onto chamfering the edges with the countersink bit. The bit made it through about 30 holes before crapping out, at which point it just started burring the edges of the holes even more. Unfortunately, it took me quite a few holes before I noticed that I was doing more harm than good. Well, I learned from my mistake, and ordered a new cobalt countersink bit from Amazon. Once the new bit comes in I’m pretty sure I can clean up the rest of the holes, reverse any damage the dull bit may have done, and be left with a functional (and stylish) cross drilled rotor.
-

- The drilling template layed out on the brake rotor.
-

- A shot of my setup for cross drilling the rotor.
-
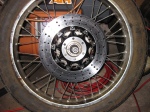
- The cross drilled rotor back on the wheel.

Leave a comment